IPv6-only hosting in 2020

February 28th, 2020 by

It’s now nearly five years since we started offering IPv6-only hosting, and what started out as a source of interesting projects for enthusiastic early-adopters has become our default for most hosting requirements.

A few things have changed over the years that have made this possible:

  • The death of Windows XP, the last significant OS with a browser that didn’t support SNI (Server Name Indication). SNI makes it possible for us to proxy encrypted connections to IPv6-only hosts.
  • The widespread adoption of secure services. This means that protocols that don’t have their own proxying features (such as POP3 or IMAP) can be proxied in their encrypted form thanks to SNI.
  • Improvements to our hosting services, such as our SSH port forwarder.

This post gives a quick run-down of how we make IPv6-only hosting a reality.

Getting bytes in

There’s no getting away from the fact that an IPv6-only hosting server still needs to be able to talk to IPv4-only clients, but there’s now a good solution for doing so for pretty much all common scenarios.

Web traffic

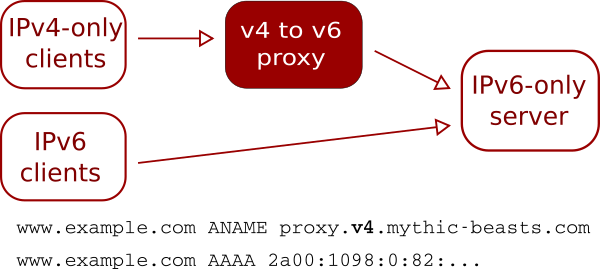
This is the most common requirement, and also probably the easiest, as it can be handled by our v4 to v6 proxy.  The proxy is a set of servers with both IPv4 and IPv6 addresses that accept traffic for various protocols and forward it to an IPv6-only server.

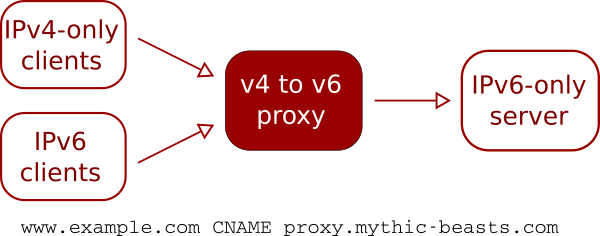
The DNS for the hosted site points at our proxy servers, by means of either an ANAME or CNAME record to proxy.mythic-beasts.com.

Unencrypted HTTP traffic is easy to proxy as HTTP 1.1 is designed to support multiple websites on a single IP address.

HTTPS is also easy to proxy, thanks to the now-ubiquitous support for SNI (its successor, ESNI, may complicate this a bit in the future, but we’ll tackle that in a separate post).

Our proxy also supports PROXY protocol, which is a standard way of communicating the original client’s IP address on a proxied connection. Support for PROXY protocol is now a standard feature of NGINX and Apache.

IPv6 traffic can either follow the same route as IPv4 traffic through the proxy (as shown above) or can be routed directly to the hosting server by setting the AAAA records for the site to point at the server rather than the proxy:

This provides a slightly more direct route for IPv6 traffic, but can make the configuration on the server a little more complicated, particularly if you’re using PROXY protocol.

IMAP and POP3

These can both be proxied in their secure forms (IMAPS and POP3S) thanks to SNI, and thankfully these secure variants are now the default choice for all popular email clients.

SSH

Our customers typically want to administer their servers via SSH, and can’t guarantee that they’ll always be connecting from a v6-enabled network. The SSH protocol isn’t built on TLS/SSL so doesn’t have SNI support, and doesn’t have any equivalent features of its own.

We work around this by providing a port-forward to all virtual servers and Raspberry Pi servers from a host with a v4 IP address, so customers can make a connection to a different host on a non-standard port, and the connection will be forwarded to the IPv6 server on port 22. Details of the host and port can be found in our customer control panel.

SMTP

SMTP is a bit awkward. It’s used in two common scenarios:

  1. “Submission”, where an end-user client sends outgoing mail using authenticated SMTP
  2. Server-to-server delivery of email.

It has multiple ports in common use:

  • 25 – the standard port for server-to-server email
  • 465 – a port for SMTP over SSL
  • 587 – the standard SMTP submission port

Port 25 doesn’t use SSL/TLS at connection time, but can be upgraded to a secure connection via the STARTTLS command, which means it can’t be proxied using SNI.

Port 465 has a confused history, having been allocated by IANA for secure SMTP, then revoked in favour of STARTTLS and allocated to a different service, and then reinstated for secure SMTP submission by RFC 8314.  Port 465 is supported by our proxy, and is a good choice for SMTP submission.

Port 587 was historically plain SMTP (RFC 2476) with STARTTLS, but is being migrated to SSL by default (RFC 8314) which is proxyable thanks to SNI.  Our proxy assumes that port 587 traffic is encrypted (because it can’t do anything useful if it’s not) and as such can also be used for SMTP submission, provided you use SSL/TLS rather than STARTTLS.

For server-to-server delivery, it’s possible to use our dual-stack MX servers to handle incoming mail. This can be done by having the highest priority MX record point to the v6-only server, and then have a lower priority record
pointing to our MX servers. v4-only servers will deliver to our MX servers, and we’ll then pass it on to your v6-only server.

This isn’t a perfect solution, as it means you can’t do connection-time filtering of incoming mail.

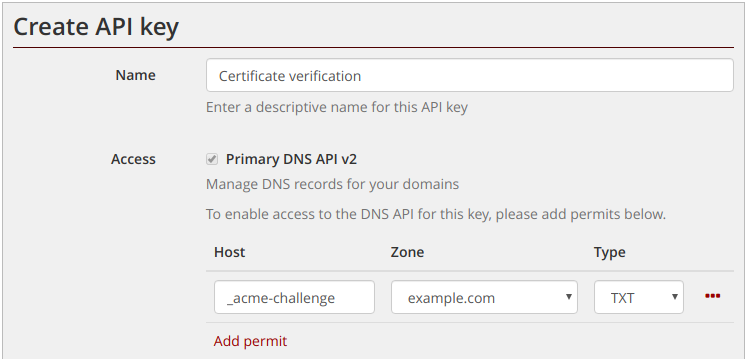
Our MX servers need to be configured to accept mail for your domain. At present, this needs to be done by emailing support.

Getting bytes out

Your server may need to make outgoing connections to v4-only servers. Fortunately this is straightforward using our NAT64 resolvers. These are DNS resolvers that when asked for an address for a host that does not have any AAAA records will provide an IPv6 address that is mapped to the host’s v4 address. The v6 address is actually an address on one of our NAT servers that will then forward the traffic to the v4 address.

There’s a 1:1 mapping between v4 addresses and v6 addresses on the NAT server – with IPv6 we can easily allocate the equivalent of the full 32-bit IPv4 address space to a single server!

NAT64 works very well in almost all cases. We have come across a few bits of software which explicitly request an A record when doing a DNS lookup, which obviously doesn’t work.

As with any NAT configuration, you’re sharing a v4 address with other users, which can cause issues for sites that perform IP-based filtering or rate limiting.

Make the switch

Like most providers, we now charge for IPv4 addresses, but unlike most other providers it’s a tax you probably don’t need pay. We offer IPv6-only versions of all of our virtual and dedicated servers, and our Raspberry Pi servers area all IPv6-only.

Learn more

If you’d like to hear more, here are some videos of a presentation that Pete gave at the UK Network Operators Forum (UKNOF).

Two Factor Auth – TOTP now available

January 27th, 2020 by

Good security practice requires two different factors.

We’ve just rolled out a much requested feature to our control panel: Timed One Time Passwords or TOTP.

TOTP is a type of 2FA. If these acronyms are making sense to you, head over to the control panel and set up TOTP.

If not, read-on…

What is 2FA?

You’ll probably have noticed an increasing number of websites that you use encouraging or requiring you to enable “two factor authentication” or 2FA.

2FA refers to requiring two separate things to confirm your identity: something you know (your password) and something you have (e.g. your phone).

2FA protects against some of the most common ways in which accounts get compromised:

  • Username/password re-use. Despite advice not to do so, plenty of people re-use passwords across lots of different sites. Every now and again, sites get compromised, and databases of usernames and passwords become available on the shadier parts of the internet. These credentials will then be tried against other sites, looking for places that they’ve been re-used.
  • Email account compromise. If your email account is compromised, it’s very easy for an attacker to gain access to your other accounts, as it’s almost always possible to reset your password by sending an email.
  • Key-logging. If your computer is compromised, or you use an untrusted shared computer, key-logging malware may be installed that logs your password as you type it to log into your account.

2FA protects against all of these. It’s no longer sufficient to know the username and password to login, and you can’t reset your password just by having access to the email account. 2FA uses “one time passcodes” which means that whilst they can be captured by a key-logger, they’re of no value as they’ve already been used.

TOTP, SMS and Recovery Codes

We now support three different methods to provide the second factor: SMS, TOTP and recovery codes. With a Timed One Time Password your phone uses a secret key and the current time to generate a unique six digit code. The code is only valid for a short period, and can only be used once. The code proves that you have access to the secret key in the phone, but does not require you to send the secret key or any part of it to us.

With SMS we send you a time-limited, one-time code via a text message. Your phone collects this and you can type it in during login to prove that you’re holding your phone.

Recovery codes are intended to be a fall back should you lose access to your primary 2FA method. These are a set of one time codes that you can store securely (e.g. on paper, in a safe) and use each of them for a single login as required.

TOTP has a number of advantages over SMS. Firstly, it’s entirely offline on your phone so that if you’re somewhere with no phone signal you can still log in. Secondly, it doesn’t rely on trusting the mobile phone network; anyone with access to the phone network could intercept your SMS code or arrange for it to be delivered to another device. Similarly you may have things like message sharing enabled which means that your passcode is delivered to multiple devices.

Setting up TOTP

TOTP is very easy to setup. You’ll need an app on your phone. You can use Google Authenticator, but we prefer the open source FreeOTP. Once installed, go to the two-factor auth page in our control panel and hit the big green “Enable TOTP” button.

You’ll be shown a QR code which you can scan into the app on your phone, and you can then start generating codes. You need to enter a code to confirm that it’s set up correctly, and you can then choose to require 2FA whenever you log into your account.

Whilst you’re there, you should take the chance to print off some recovery codes.

Hosting made Sympl

May 21st, 2019 by

Sympl is so simple it’s even usable by Cambridge graduates

We’re pleased to announce that we are now supporting the Sympl open source project.  Sympl is a fork of Symbiosis, a platform that makes hosting websites and email on a virtual or dedicated server simple.  Once installed, configuring a new website, or creating a new email address and mailbox, is as simple as creating a new directory.  Web server, mail server and DNS configuration is all taken care of for you.

We’ve already taken the first steps towards integrating Sympl into our infrastructure by implementing support for our DNS API in OctoDNS.  For our next step, we will be adding support for OctoDNS to Sympl.  This means that it becomes possible to use Sympl with our DNS infrastructure, but equally you can use any other provider supported by OctoDNS (we don’t believe in lock in!)

We’re now very pleased to welcome Paul Cammish, the newest member of the Mythic Beasts team.  Paul has considerable experience, having worked at a number of different ISPs since 2000, most recently at Bytemark.  Paul created the Sympl project earlier this year, in order to provide ongoing support and enhancements for the platform.

We’re very excited by the possibilities that Sympl provides, and have some interesting ideas for future developments once we’ve dealt with the immediate priorities of DNS integration, and support for the upcoming Debian Buster release.

The source code for Sympl is now available in our self-hosted GitLab instance.

Moving to Mythic Beasts just got easier

April 9th, 2019 by

We’ve just rolled out a major overhaul of our DNS management interface. We hope that you’ll find the new interface faster and easier to use. As well as improvements to the user interface, we’ve also added the ability to import zone files. This means that if you’ve got a domain that is currently hosted with another provider, you can now easily transfer all of your DNS configuration to our servers in bulk (provided that you can get them to give you a copy of your current zone file).

Our DNS management interface is included with all domain registrations.  It’s also available for domains registered elsewhere for customers of our other services, including hosting accounts, virtual servers, dedicated servers and Raspberry Pi servers.

The DNS interface includes DNS API access, allowing you to support dynamic DNS and to automate other DNS management tasks.

We believe in retaining customers through good service rather than lock-in, so naturally there’s a corresponding zone file export feature.

Round-robin DNS – another use for ANAMEs

March 22nd, 2019 by

Sensible people don’t like to hard code IP addresses in lots of different places in DNS. Better to assign it a name, and then reference that name, as it makes it clearer what’s what and if you ever need to change that IP, you’ve only got to do it one place.

CNAME records can be a good way to do this, by aliasing a DNS name to an IP. Unfortunately, the DNS specs prevent you using CNAMEs in various places that you might want to, most commonly at the root-level of your domain (the dreaded “CNAME and other data” problem).

This is where ANAME pseudo-records come in. They look just like a CNAME record, but rather than being added to the DNS, our server converts them into A and AAAA records. This allows you to get the benefits of a CNAME in places where a CNAME is not legal.

This week a customer suggested another use for ANAME records that we’d not previously thought of: round robin DNS. That is, a single DNS name that points to multiple servers. As you can’t have multiple CNAME records for the same hostname, implementing round-robin DNS means hard-coding A and AAAA records into your zone file. Like this:

proxy.mythic-beasts.com. 3600	IN	A	93.93.129.174
proxy.mythic-beasts.com. 3600	IN	A	46.235.225.189
proxy.mythic-beasts.com. 3600	IN	AAAA	2a00:1098:0:80:1000:3b:1:1
proxy.mythic-beasts.com. 3600	IN	AAAA	2a00:1098:0:82:1000:3b:1:1

Which is messy. Wouldn’t it be nicer to use the names of the servers involved? Like this:

proxy.mythic-beasts.com. 3600	IN	CNAME	 rproxy46-sov-a.mythic-beasts.com.
proxy.mythic-beasts.com. 3600	IN	CNAME    rproxy46-hex-a.mythic-beasts.com.

Sadly, the spec says you can’t do that, but thanks to a minor tweak to our DNS control panel code, you can now do it with ANAME records. Simply specify multiple ANAME records for your host name, and we’ll go and find all A and AAAA records for all of the hosts that are referenced.

Thanks to @grayvsearth for the suggestion on this one.

ANAME records are available in our DNS management interface, which is included with all domain registrations, and available for free on other domains for customers of other services. Other features include a DNS API, allowing you to obtain Wildcard Let’s Encrypt certificates.

Let’s Encrypt wildcard certificates

February 15th, 2019 by

Wildcard… sounds a bit like wildcat… cat pics!
Photo by Peter Trimming, CC BY 2.0

We’ve just made some changes to our plugin for dehydrated in order to better support Let’s Encrypt wildcard certificates.

Unlike normal certificates, which can be obtained using a web-based challenge, Let’s Encrypt’s wildcard certificates require a DNS-based challenge. In other words, you need to prove that you can control the DNS for the domain for which you are requesting a wildcard certificate.

Mythic Beasts provides a simple API for controlling DNS, which makes it possible to automate the process of responding to these challenges, and we provide a plugin for the popular dehydrated client that does just this.

We’ve just deployed a minor change which means that it’s now possible to obtain a single certificate for a domain, and a wildcard under that domain.

Access to our DNS API is included with all domain registrations. For more information, please see our instructions on using DNS-based challenges wih Let’s Encrypt. Please note that in order to obtain wildcard certificates you need to be using dehydrated version 0.6.0 or later.

Mythic Beasts acquires VMHaus

November 26th, 2018 by

Our pet wyvern was hungry again.

We’re pleased to announce that Mythic Beasts has acquired VMHaus, a virtual server provider with facilities in London and Los Angeles. We will continue to run VMHaus as a separate brand selling low-cost, prepaid virtual servers, which we believe will complement our own virtual server products well. We’re also pleased to announce that VMHaus co-founder Basil Fillan has joined Mythic Beasts as a full time employee. Basil has been responsible for the development of the VMHaus technical infrastructure, and will be ideally placed to help us provide support to VMHaus customers.

In the short term, VMHaus customers will see no changes to their services. Payments and invoicing will continue to be through VMHaus Ltd, and we will continue to accept new orders for VMHaus products. In the medium term, we’re planning improvements to both the VMHaus platform and our own virtual server infrastructure, based on our combined experiences of developing the two systems.

On the VMHaus side we hope to be able to start selling virtual servers in Amsterdam early in the new year, and also be able to offer IPv6-only virtual servers at a discounted rate. VMHaus customers will also be able to take advantage of our other services such as domain registration and backups.

On the Mythic Beasts side, we expect to be able to offer service upgrades thanks to the economies of scale resulting from the acquisitions of VMHaus and of BHost this summer.

OpenWRT install to RAM – run iftop on a router with very limited flash

November 23rd, 2018 by

OpenWRT is awesome, as it allows you to run proper Linux tools on your home router. I’m currently using a very old, underspecced TP Link box, with 32MB of RAM, but just 4MB of flash storage. This is just enough to get what I need installed, but one thing I’ve always wanted to do is use iftop to quickly see what’s using all the bandwidth. Unfortunately iftop, with its dependencies on libpcap and libncurses, just won’t fit into a 4MB image.

I recently stumbled across opkg’s install-to-RAM option, allowing me to use the 32MB of RAM to install the package, with the minor and obvious downside that it gets uninstalled when the router gets rebooted. For something like iftop, which is used for ad-hoc diagnostics, this isn’t a big issue.

Installing to RAM puts the packages under /tmp, so a little effort is required to make sure that libraries and other resources can be found. I now have the following shell script which installs iftop if it isn’t already, sets some environment variables and invokes iftop:

#!/bin/sh

if [ ! -f /tmp/usr/bin/iftop ] ; then
  opkg update
  opkg install -d ram iftop
fi

export LD_LIBRARY_PATH=/tmp/usr/lib
export TERM=xterm
export TERMINFO=/tmp/usr/share/terminfo/

/tmp/usr/bin/iftop $@

Fortunately I do have enough free space on flash storage to store the above script.
Obviously a similar approach could be used with other packages that are only needed “on demand”.

Let’s Encrypt, Dehydrated, Curl and redirects

March 15th, 2018 by

We use Let’s Encrypt for SSL certificates, and our preferred client for obtaining certificates is the simple but effective dehydrated shell script, not least because it’s packaged for Debian.

On Sunday, we started getting some alerts relating to a failure to automatically re-issue Let’s Encrypt certificates. A quick bit of digging yielded this error:

+ Creating fullchain.pem…
  + ERROR: An error occurred while sending get-request to http://cert.int-x3.letsencrypt.org/ (Status 301)

Let’s Encrypt have started including an HTTP redirect as part of the certificate issue process and dehydrated doesn’t pass the necessary option to curl to follow the redirect. This can be fixed by patching dehydrated (and a packaged fix for Debian Stretch is now available via Debian backports), but it can also be solved with a simple config change:

echo 'CURL_OPTS="-L"' > /etc/dehydrated/conf.d/curl.sh

Naturally, customers of our managed hosting services and customers using the free HTTPS option on our hosting accounts need not worry about this issue. Our managed hosting includes monitoring all HTTPS websites for certificates nearing expiry, so we become aware of any issues well before your users do.

Chrome to brand non-HTTPS sites as “insecure” – time to click the button

February 12th, 2018 by

As reported by The Register, sites which do not use HTTPS will soon be actively labelled as “insecure” by the Chrome browser. HTTPS is the secure form of HTTP that makes the little green padlock appear in browsers.

Ultimately, sites which use HTTP are going to be labelled like this:

Example of HTTP site labelled as "not secure"

Not subtle, eh?

The Reg article suggests that initial changes will be deployed July 2018, and will be a little more subtle, but with Chrome having 55-60% market share, it really is time to switch your website to HTTPS.

Fortunately, if you’re hosted with Mythic Beasts this is really easy.  All of our hosting accounts include free SSL (aka TLS) certificates (provided by Let’s Encrypt), and you can enable HTTPS hosting by just clicking a button in the control panel.  Here’s how:

Enabling HTTPS for your Mythic Beasts-hosted website

First, log in to our customer control panel, click on “Hosting and shell accounts”, and click through to the hosting account for your site.  Now find your site in the list, and click on “web settings”:

If you have both a “www” prefixed and bare version, as above, you’ll want to do both. 

On the web settings page, scroll down to the “security” section:

Screen shot of security settingsYou almost certainly want the third option: this will enable HTTPS hosting, and ensure that users see the secure version of the site by default.  (Once you’re happy that your HTTPS site is working exactly as you want it, you could consider switching to the fourth option).

Click, hit “save changes”:

Screenshot of "changes saved" messageWe’ve got plans to make this faster, but for the moment, you’ll need to wait a few minutes.  We’ll go and obtain a certificate for your site, and once installed update your site so that it redirects to the HTTPS by default.

Screenshot of HTTPS location bar

Bingo!

If you haven’t got a working HTTPS site within 10 minutes, email us – we’re here to help.

Any gotchas?

The instructions here will only work if the HTTP version of your site is hosted by Mythic Beasts.   If you’re configuring a new site with Mythic Beasts, make sure that you can access your site via HTTP before enabling HTTPS.

If you’re transferring a site to us that is already using HTTPS, please see our transfer in instructions for how to do this with an interruption to service.

Managed hosting

We’ve been deploying HTTPS as the default for customers of our managed services for some time. We’re going to be doing an audit of all managed sites to warn customers of this upcoming change, but in the meantime, if you’re a managed customer with an http site, just email us and we’ll sort it out.